If you have wondered what the numbers 192.168.203.1 on the back of your wireless router mean – these are your device’s default private IP address used to access the router’s access point. To manage traffic and prioritize your network usage, you can configure IP QoS (Quality of Service) settings at this address. Assigned by the router’s manufacturer, the default IP address is the backbone of your WiFi, used to establish a connection between all gadgets you connect to the network. The 192.168.203.1 IP address is also where you go to access your router’s admin page, where you can manage network priorities using IP QoS (Quality of Service) settings, improve the security of the wireless, enable built-in features such as a firewall and VPN, and much more. The default gateway is crucial as it is the address users enter to access their router’s settings. You can also change the router’s default IP address at any time you’d like.
How to Get into The Admin Menu of your 192.168.203.1 Router Login Page
Your router’s local IP address can be easily found in one of three places:
- The user manual that came with the device
- The manufacturer’s website, after searching for the exact model
- The label at the back of the device itself.
Once you made sure that 192.168.203.1 is indeed the private IP address your router is using, you can proceed to typing it into the address bar of the browser you are using to reach the login page. It is important to update the login password for security reasons. Make sure to use the default username provided by the manufacturer for the first login. Just make sure that you are connected to the WiFi, or directly to the router via an Ethernet cable first. The username and password you should use to access the menu will be listed in the same places that as the 192.168.203.1 private IP. Common issues that can obstruct router login include incorrect local IP configurations, connectivity problems, hardware failures, and mistakes made while entering the URL in browser search fields.
How to Change Your Private IP Address to 192.168.203.1
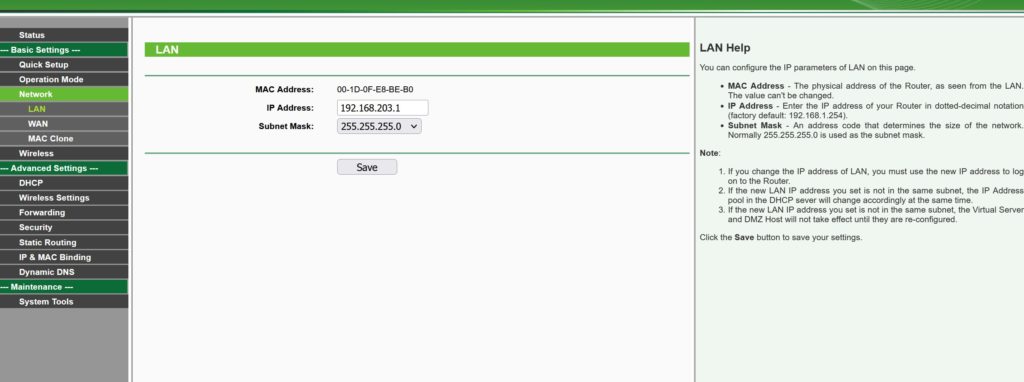
If you’d like to maybe change the private IP address that your router uses from the default one to 192.168.203.1 (or vice versa), you can very easily do that from the router’s IP address section (usually a tab) in the admin menu you just gained access to. To change the IP address, go straight to the router settings and ensure you enter the correct credentials (user and pass). When changing the WiFi password, ensure it’s complex and contains all kinds of characters to prevent unauthorized access. So, to do that, simply log into the admin panel at 192.168.203.1 (or your current private IP) and look for the Network Settings tab. There you will see the IP currently in use listed, as well as the option to edit it. You can update it to 192.168.203.1 and simply hit save. Just remember that the next time you try to log into the admin menu, you will need to use that default IP address.
Update your SSID at 192.168.203.1
The Service Set Identifier (SSID) makes your wireless network stand out among other networks within wireless range. Securing the SSID and WiFi password is crucial for maintaining stable internet access. The name of your network can be something personal to you, or if you are using your 192.168.203.1 router at the office, a professional designation – the name of your company, or your department. To improve security, change wifi password regularly in the admin panel. In any case, it would be a good idea to change the SSID from the default one, which is usually the brand and model of your router. This should be done for security reasons as well because potential hackers will have a harder time accessing your WiFi settings when you do that.
Set Up a Secure WiFi Password for your **WiFi**
You should definitely make sure to set up a secure, hard-go-guess password that you and other members of your network are going to use to log onto your WiFi. A strong password serves as the first line of defense against network intrusions. You can do that in the same sub-menu that you went to update your network’s SSID. Once you click on the Wireless Settings tab, go to the SSID field, and you will find the password right beneath it. Most routers require at least 8 charcters for a password but 12 is the common advice. Mix upper and lower case letters, numbers and symbols for your password. Make sure you remember your new password as you will need it to log into your WiFi after you hit Save.
Fix Potential Issues with your Router’s Connection
You try connecting to your router at 192.168.203.1, or browse the internet and get a Connection error message. If you get a proxy error, check your browser proxy settings to ensure they’re set correctly for your network – which is sometimes the case. The first thing to do in this case is to check if the lights on the front of the router are on and green (or blinking), orange or red means there’s an issue. You might want to double check the LAN cable connection as well. Restarting the router device by unplugging the power cord for about 15 seconds and plugging it back in is the most common method to fix the Connection Error message. It works 90% of the time. If the issue persists after that, call your ISP.
Troubleshooting connectivity issues with a router at 192.168.203.1 requires a methodical approach to identify and fix the problem. Here are the steps to help you diagnose and fix the issue:
- Physical Checks: Start by physical checks. Make sure all cables are plugged into your wireless router and devices. Look for any visible damage to cables or ports.
- Power Cycle: A simple power cycle can fix minor issues. Turn off the router, wait 30 seconds and turn it back on. Give it a few minutes to boot up.
- Check IP Configuration: Make sure your device is set to obtain an IP address automatically (DHCP). Wrong static IP settings can cause connectivity issues. Understand the difference between public IP addresses and private IP addresses, as they play different roles in network connectivity.
- Ping Your Router: Open the command prompt or terminal or the so called cmd on your computer and ping the router’s IP address (ping 192.168.203.1). If you get responses, it means you’re connected to the router.
- Check for Firmware Updates: Outdated or old router firmware can sometimes cause issues or bugs. Go to the router manufacturer’s website to check for firmware updates and apply if available. In some cases you might have the automated update function in the admin panel, but that’s rare.
- Reset Your Router: If, for some reason, the issue still persists, you may need to reset your router to its factory settings. This can be done through the router’s administration page (logging in as admin) or by using the physical RESET button – beware as it is in many cases a tiny whole on the device itself. Also be careful as this will erase all previous configurations, and it can potentially impact your internet connectivity. Ensure the router remains powered during the process – that is super important.
- Firewall and Security Software: Disable or tweak your computer’s firewall and security software as they might be blocking the router.
- Interference: Check for other electronic devices and Wi-Fi networks around you. Adjust the router’s channel if needed.
- Call Your ISP: If none of the above works, the issue might be with your ISP. Call them to check for any service outage or issue on their end.